Pages

Wednesday 30 September 2009

Sweet and Pretty...Not me!!

Over the weekend I was still snuffling and coughing like I was at least 100!! The difference to Friday was that I wasn't  like one little pig..I was like all three little pigs and the wolf too!! I was doing the snuffling and snorting of the little pigs like there was three of me...plus I was huffing and puffing like I was going to blow the house down!!

I tried Vick, Olbus Oil, steaming with menthol crystals.....sipping hot chai with honey, ginger and lemon...and so much more!! The result was zilch. By Monday I had well and truly got a wheeze and I felt like I was drowning. The only thing to do was to call the doctor.  I tried to breath and talk at the same time, not something I normally struggle with, lol.  All the huffing and puffing must have made me sound like an elderly frail lady and he told me I needed to come in so he could check me out. When I got there he took a listen ....with a very cold stethoscope.....and prescribed antibiotics for a chest infection. I hope these work, if not they'll need to put me down. I'm a hazard to the healthy!!

Today I'm still feeling rough but don't want to spend too much time lying in bed in case it makes my chest worse....hopefully tomorrow will bring results. Good ones that is!!

Enough of my woes...I need to say thank you for two lovely awards that were passed to me last week. I have been dreadful the last few months in keeping up with these and passing them on. For my past sins, I apologise. I have turned over a new leaf and will deal with these promptly in future, promise!!

Swapna at Crafts and Cooking passed me this extremely chic, very Parissien looking award. It is gorgeous, thank you! I love Crafts and Cooking, the recipes make my mouth water every time I visit...which is most days. Drop by and see for yourself.

J'Adore Tien Blog Award 2009_swapna 

The rules are

  1. Add the logo to your blog
  2. Link to the person who passed on the award
  3. Nominate blogs of your choice
  4. Leave a message on the nominee blogs

I pass the award on it these favourite blogs:

Digi Vickie's Word Art

Beettle's Memories 'n Ramblings

Linda's Lot

Chris at Bling_Kin_Eck


The second award was passed to me by the lovely Jackie (Shinade) at The Painted Veil. Her blog is full of colour as she shares the results of her wonderful photography, plus she is such a lovely lady. It's well worth a visit!!

moms_blog_award_jackie

I pass this award some more special blogs:

Will Oaks Studio

Kim's Scrappin'

PJ's Prose

From a Little Yellow House In England

My Gypsy Goods

And finally before I go a small gift, a mini kit. All I can say about it is; it's simple, bright and I think quite pretty. So Enjoy!!

jsch_sweetsimple_folder

You can download Sweet and Simple here

I have had so many problems uploading to 4shared this last few months that the download is via Media Fire. I am so sick of spending 20 or 30 attempts


Take care and see you soon.

Friday 25 September 2009

Overlay Painting Tutorial

 jsch_paintoverlay_folder

Okay..before I start...if you hear a loud snuffling and snorting..it's me. I sound like a pig searching for truffles, sniff, snort, sniff. I have a cold and sore throat, plus it doesn't help that my nose is glowing a very luminous red!! Too many tissues!! So imagine a pig with a clowns nose and you've got me in one!!

I nearly forgot to mention the cough..a sort of raw hacking noise.....that will not be suppressed..as my DH has found out. Other details I won't describe, I don't want to put you off completely!!

jsch_paint


Anyway, on to business. Paint!!!!

I thought I'd share a little a tip about using overlays in a short tutorial. Not only can you stack overlays to make your background papers, you can also add extra layers and stick a little paint on them. If you play with the blending modes, then you can have some real fun. I use Photoshop CS2 but you can apply the principle in most software packages.

In the tutorial I will keep things simple but you'll get the basic idea and then it's up to you to experiment!! I haven't tried to be subtle with the blending modes, I've just tried to make it simple...the finer points are up to you!!

The overlay that I used  is included in the download with a PDF of the tutorial. You can use the overlay for Commercial or Personal use. If you already use this technic...I apologise....ignore me!! Lol!

Right let's get going.

1. Open up a new file 12x12, 300dpi, transparent and fill it with the colour of your choice.

I used a brown colour for my base layer bc7d5c, but feel free to use any you want. (I renamed this layer colour)

2. Now open the overlay file that came with the tutorial, jsch_pattern_example.png

3. With the overlay file as the active one, hold down the Shift Key and drag it into your new file with the colour.

(Holding down the Shift key will make sure that the overlay is central when it has been moved.)

4. When you've done this, change the blending mode of the overlay layer to: Overlay, 78%.

5. Now for the start of the fun part. Make new layer above the overlay.

(You can do this by Layer>New or by clicking the small icon, second from the right at the bottom of the Layers palette).

Rename the new layer to Paint 1

6. With the Paint 1 as the active one, select the paint brush you want to use. I choose a soft round brush, size 800. This size just covers the flower like centre of the pattern on the overlay.

The quick way to get the brush ready is select the brush icon in the left tool bar. Then change the size in the top tool bar by click the down arrow next to the brush shape.

image


Choose a soft brush from the drop down list and then at the top change the px size to 800.

image

This is what your top tool bar should look like when you've done.

image

7. We need to pick the colour we want the brush to paint with. I choose a bright turquoise blue, 5accd6. Again it's a matter of choice.

Make sure that the new layer is still your active on and then we can start to paint.

Hold the brush over the middle of the flower like shape and click once.

image

Continue doing this until you have all the shapes you want covered. (You can use different colours over each shape, but for now I'm just using this one to keep it simple.)

image


When you have finished painting the shapes and your happy with it, turn of the Paint 1 layer by clicking the little eye on the left of the layer. We can turn it on later when we've done the next stage.

8. Make an other new layer above Paint 1, exactly as we did before and rename it Paint 2.

We'll use the same soft round brush but we need to change the size of the brush so that it just covers the centre of the flower shape.

To change the size make sure you still have the paintbrush icon selected and then in the top tool bar click the down arrow next to the brush shape and change the brush size to 150px. (You can also change the brush size by pressing the ] key to make it larger or the [ key to make it smaller.)

We also need to change the colour. I have used a green, 3ed895.

We're ready to paint . So line up your brush and click once on centre of the first flower shape.

image

Continue doing this until you have covered all the centres of the shapes. Again you can change colour for each one if you want. If stuck to this one colour.

image

9. When you have complete all click on the Paint 1 layer to make it active again. Change the blending mode to Overlay, 90%.

10. Click on the Paint 2 layer and change the blending layer to Colour Burn, 64%.

(Okay, this is not very subtle but the subtle bit is for you to do later!Lol.)

image

This is what you should have.

I have kept the tutorial to the basics, but you can add texture to the painted layers via the Layers Style Palette, change the blending modes, use different shaped brushes...the list is endless!! Just play and experiment!! But most of all have fun.

You can download the tutorial in PDF format with the overlay here

Have a great weekend!!

Thursday 17 September 2009

Should the Photograph Be Bigger?

Autumn has arrived in my neck of the world. The last of our flowers are wilting and the sunshine is starting to loose it's warmth. I have to admit it wasn't a particularly warm summer here in England anyway, but now in the morning and evening there is a decided nip in the air. Soon the leaves will turn and the descent towards Winter will have started in earnest. The wonderful colours of Autumn will be my compensation for the colder days to come.

SONY DSC

One of my last garden blooms

About now most of us find we have stacks of photographs from summer piling up to add to our album pages. With this backlog in mind, I had some of my layouts printed to clear my PC for the new ones to come. I was proudly showing them to one of my friends when a chance remark made me stop and examine my pages more closely. It made me think...yes, I do occasionally indulge in thought, lol.

Irene doesn't scrapbook herself, but she was really interested to take look at mine. Imagine my surprise to hear her ask why scrapbook pages gave so little prominence to the actual photograph!!

Being artistic and crafty herself, she's looked before at scrapbooking on the Internet but decided that she preferred her photos as they come. Whilst she agreed many of the layouts she had seen were beautiful and extremely artistic, she did feel that they were more a showcase for the persons skills or artistic expression than for photographs.

Okay, by now she had my FULL attention!! What..she thought I was not giving centre stage to the lovely Lilly in my pages!!!

As an illustration of what she meant, she mentioned pages with one small photo with cluster/s behind or around it, the rest of the page using lots of white space. I have to admit, I for one, love these sorts of pages. I tried to explain that those really can have a dramatic impact because of the space the eye was led to the photo and made it the star.

She was not convinced!! Rubbish..was her loud rely!!! It merely meant in years to come when fashion and fads had moved on, people would peer at our pages and wonder why we had made the gorgeous photograph so small and left so much blank space.

I have to admit, by now my feathers were extremely ruffled. Then the realisation of how she saw things started to dawn. I stepped back and thought about what she had said...she was in some ways right. Some of my pages didn't have journaling and the photo was a very small part of the overall layout. At first glance they do appear to be more artist expression pieces than memory pages for the future. Eeek!! What have I done!!

It raised the question in my mind should the photograph be bigger or more prominent on our pages? I know that we all have our own style but if you look around many, not all, layouts don't give prominence to the photo or journaling. Often they tell us more about the scrapper and their skills than they do about the person or event in the photograph. Many...like me...are guilty of no journaling at all on some pages, to note the event, date or person.

Bettina sent me this beautiful page of her granddaughter Lili and perhaps she has got the right idea...photo prominent at a good size, plus an indication of who and when. The fun wordart conveys the emotion behind it. I love it, for me it ticks all the boxes!! A great example of an album page with loads of style.

DeathToAllSpiders_bettina

Credits: Lilly's Quilt Freebie Cens Stuff, Wordart by Bethanie

No the example below of one of my pages is just the opposite!! Loads of fun but not good!! No name or date just a sentiment that I felt about the lovely lady in the layout....oops!! Rethink needed!!

jsch_flyinghigh

Credits: Cens Stuff, Kite by SammyD at Scrappin Digi Kreations 


The next layout was for my brothers 50th birthday album this summer. It' s got names and dates plus it says in the park, but I should have put where the park was perhaps and little journaling. I should also have put the names in the top picture in the order the people appear on the photo!! It would help!! I know who they are and where but others won't, so perhaps a few more facts on this heritage one.

(Yes, the child standing up on the swing is me!! The boy is my brother and the dark haired girl is my youngest aunt.)

arthur _01


But that still left me begging the questions.....

Should the elements and white space play a less prominent part in our pages? Should the photograph and journaling be the stars? Have we lost the plot on this and we can't see the wood for the trees? Are we more concerned with showing off our own skills than preserving the memories? I am guilty of at least some of the above!!

So many questions..so little answers!! This needs some more thought!!

As a family historian I can imagine the frustration of future generations at the lack of journaling and questioning why we choose to utilise the space the way we did. But....the albums will pass on something else to them as well, they'll let people see the scrapbooking style and fashions over a period in time. They'll show the talent and skill of the person who made the album and illustrate the technics available at the time. So, perhaps our album pages will end up conveying  different or incomplete information about us and our memories but they will still be marvelous records to pass on.

That chance remark has certainly made me think and look at my layouts differently. I've looked and reexamined what I'm doing and why. I'm not saying I'll change the way I do everything but I certainly will think more about how I preserve my memories.

What are your thoughts on this? Should the photograph be bigger or the journaling always present?

Check back tomorrow I have a little something for you!! Until then take care have fun!!

Thursday 10 September 2009

Photoshop Tutorial

I thought it was about time that I did an other tutorial as it's been a while since the last one. Layouts can look really good with the text wrapping partly around your photograph or an object and it’s actually not so hard to do. This tutorial will walk you through it hopefully in an easy to understand way.

My text in the tutorial was done really quickly ...and yes...it could have done with a tidy up!! But the principle on how to do it is here and I know you will all be a lot more tidy than I was, lol!!

So let's get started.I'm going to show you on a basic background with a photo. It makes it simpler for you to see what I'm doing.

jsch_wraptext_tut_folder 

1. Open the background and photo you want to use on your layout. Position the photo where you want it and then we are ready to start the tutorial.

2. Select the Rectangle Tool from your side tool bar.

  image

Make sure that you have the Paths icon selected in the top tool bar and the Add to Path icon too.

image

3. With the photo layer as the active layer drag out a rectangle to include all or  part of the photo plus the area that you want the text to appear in. Have a look at mine below to understand what I mean. The rectangle I have drawn covers part of the photo and part of the background.

image

4. With the rectangle tool still selected we need to make a change in the top tool bar. Click the Subtract from Path icon, this means that we can now take the photo part out of the selection we just made.

image

Now drag out a rectangle to cover the area of the photo that is inside the rectangle. I always include a little of the background too as I like a small border around the photo with no text.

image

5. Select the Type Tool from the side tool bar.

image

Pick the font, size and colour you want to use for your journaling  then click in the top left of the rectangle, where you want the text to start. Type in your text and it will fit around your photo.

image

When you’ve finished and have the text how you want it, press the Move Tool to get rid of the Type Tool and then press CTRL+H. This will hide the path and you will see the finished result.

image

Have fun!!

If you want to download the tutorial as a PDF File you can find it here.

Friday 4 September 2009

Cake Heaven

This week I have been in cake heaven.....and muffin heaven....and oh yes in pudding delight. My taste buds have been working overtime and my house has been full of gorgeous aromas, pleasantly scenting the air and making everyone's mouth water.

How this wonder came about is all due to a new book that I agreed to view and review as part of BloggerAid. When the book arrived I have to admit that I was a little nervous. Savories and pastries are normally my forte and in the past I have been known to have a few little teeny disasters with cakes. Ask my family, they will agree, well perhaps not about the teeny bit!!

So, imagine my delight when I discovered a book with triple tested recipes for success every time. That's what the cover said..and it was true. The recipes worked perfectly even for me, with my cake curse!!

The name of this wonder book?

bookmix

The Australian Women's Weekly Mix - Cakes, Muffins, Biscuits and Puddings, published by ACP Books (ISBN9781863968690).

From the beautifully illustrated cover your led through clear and easy to follow recipes, studded with extra hints and tips. There's a great conversions table at the back so that the recipes make sense and are accurate, no matter where you live or what measures you are used to. So often I spot and mark "must try" recipes and end up having to approximate on the measurements...not a good thing to do if you want the best results. Here it couldn't be simpler.

Imagine my relief when I discovered the section that gives advice on how to achieve success with the different sort of recipes in the book. Just what I needed, they must have had me in mind when they wrote this bit. Reading it made me understand where previously I may have gone wrong and not got the expected results. For example...Did you know that the quicker you mix in the liquid to the dry ingredients when making scones, the lighter your scones? I for one was not aware that it would make much difference...but I tried it and it does!!

An other godsend is the glossary at the back. It can be confusing when ingredients are known as something else in the country you live in, but this clever section explains exactly what they are clearly, concisely. I had several "ah, that's what it is" moments on reading it but ended up with everything crystal clear and understanding exactly what it was I needed.

The book offers a huge choice in recipes, from classics and well known favourites, to chic cafe-style recipes too. It certainly made my choice of which to try difficult, they all looked so delicious. A further bonus was that the recipes were not laden with fat and sugar, which can often be a problem with dessert recipes. An other bonus is the inclusion of some gluten free and dairy free recipes, ideal if you have problem with either of those as my daughter does.

I eventually singled out five of the recipes...I know...five!!! Well, I had to make sure they worked. The small fact that there was tasting afterwards had of course nothing to do with the large number I opted for..as if!! I made the five items over two days and I can honestly say they all went down a storm with my family and I thoroughly enjoyed making them. No stress just read, prepare and then do just what it said....that simply.

I picked out the Spicy Scone recipe from the first section..and yes, I added the liquid in quickly as the tip said..so they were wonderfully light and fruity with a beautiful cinnamon flavour. A pure delight with butter.


spicy-scones


The next one that caught my eye was the berry and yogurt muffins. The preparation was simple and the recipe appears to be a healthy one with rolled oats, yogurt and berries. Delicious and healthy, what more could you ask. Perfect!!

berrymuffins

The carrot and banana cake in the cake section sounded an ideal combination, so I gave this one a try too. It was easy to put together and then just pop in the oven and leave it to work it's magic as it cooked. The cream cheese frosting gave a wonderful contrasting taste that made a perfect balance and helped this stand out from your average carrot cake. I have to admit that I added a little grated chocolate to the top , that's just my thing but promise it's the only thing I changed. The results were pleasant light, I've had problems with my carrot cakes being heavy in the past..but it was just that, a problem of the past. This time it turned out terrifically. A definite must bake again..

 carrotand-bancake2

I completed my selection with crunchy muesli cookies and coffee and pecan puddings with a caramel sauce...mm the sauce was to die for.  All uncomplicated to make and brilliant results. No one was more surprised than me that my success rate was 100%. Truthfully it was, despite my natural cake making handicap.

Perhaps it appears that I got a little engrossed in the baking this week.....I did. This book was a pleasure to read and use and it's one that I know I will return to again and again. With 400 pages in total I still have lots of recipes to try and so much more enjoyment to come!

What's more I discovered that Australian Women's Weekly do a series of books covering most recipe areas. So, now I know what will be on my Christmas list, a few of the others. If they are only half as interesting and successful as this one then they will be a welcome addition to my bookcase.

Now, all this food talk has made me hungry, so I'm off to find something to eat and maybe take an other peek at what else I can bake. Have a great day and why not drop by and checkout BloggerAid, it's a wonderful cause and great fun too. Go have a look and see what you think.

Tuesday 1 September 2009

Spider Alert!!

Last night I was well and truly traumatised!! There were spiders everywhere I turned. Okay, I'm exaggerating just a little, but there were several..all in one day!! I'm not a coward...honest, I'm not...except when spiders are around. I don't know what it is about them but they make my skin crawl. 

spider

I found two in the hall during the morning and I thought that was bad, but at bedtime...it got worse..much worse!! My DH went to bed earlier than I did, I was finishing some work on my PC and needed to get it completed last night.

Eventually with my work completed, I climbed into bed and snuggled down feeling nicely relaxed. I was looking forward to reading the next section of my book before I went to sleep. An hour quickly passed as I lost myself in the story and I felt like it was time for lights out. So, down went the book and the pillows got a good shuffle to get me comfy.

As I lay back to check they were right...I saw it!! Up there poised above my head, staring straight at me and smiling (I swear it was)... .was a spider. Quite a big spider!!!

God, it could drop on me at any second. Should I move or should I jump out of bed? Would it drop on me if I jumped? Believe me it was like 20 questions zooming through my head.I thought of nudging my DH but then thought that may not be such a great idea. There was nothing else for it...I would have to deal with it myself!!

This needed careful manoeuvring, I didn't want that nasty hairy spider on me!!! Aaah, just the thought made me come out in goose bumps!! I crept out of bed..keeping low...well I sort of slithered out hugging the mattress and onto the floor. Whew, at least I wasn't in it's drop path any more...now down to action!!

I grabbed one of the cushions from the bed (there are loads..way too many) and climbed back on to the bottom of the bed. Now all I had to do was knock it off the ceiling with the cushion and over towards the window. Steady girl, don't panic!!! I wobbled on the mattress, it's a memory foam one, wonderful to sleep on but not so great for standing on. I pulled the cushion back like I was about to do a golf swing on the ceiling and whoosh...impact!! Spider gone from the ceiling...magic! I checked that wasn't near the bed and then climbed back in, making sure I left the cushion I had used far, far away form the bed.

Needless to say I needed to read some more as I was not feeling quite so relaxed now. But, if I just read a few more pages, then sleep.

All was well...at least it was until an other spider crawled over the pillow next to me and yes...it was doing that staring again!!!! In fact this one was waving Hi.

Oh, ah...no...scream...HELP!! HELP!!HELP..it's going to get me!!!

So okay, that's what husbands are for isn't it? I had tried with the other one but this one was a sneaky guy and he took me unawares..and he was so close. I mean screaming was a natural reaction...right? Now, I have to tell you, my DH is wonderful...long suffering, but wonderful. That is...except when he's woken up in the middle of the night by a screaming lunatic who is totally incoherent, but with very powerful lungs.

Moving slowly....admittedly with an angry glare, at me not the spider.... he removed the offending monster. Muttering a few choice words, which I won't repeat... he put a pillow over his head and went back sleep. Me? I was awake for sometime waiting to see if any more "visitors" with eight legs were going to drop in or creep out on me. But finally.....sleep came and peace returned.

Now I've shared my horror story, I'll behave and get down to scrap talk!!

Have  a look at the elements that I made to go with the Lilly's Quilt Paper Pack. These too were inspired by the quilt. I hope that someone out there can put them to good use.

jsch_lilquilt_folder

You can download the Lilly's Quilt Elements here

I'm busy trying out some recipes in a terrific new book that I've got. It's all cake, muffins, biscuits, cakes and puddings recipes..and they are gorgeous. In my next post I'll let you know how I got on and share the results with you...well, not really share as I'm the one that gets to eat them...you only get to see them, lol!!

Take care and have a great evening!!

Sunday 30 August 2009

When Life Keeps Bowling You Out...Get a Bat and Hit Back!!

The last two weeks have flown by, filled with family commitments and crisis, hopefully life has started to level out and peace will return to the Schutrup's household. Even if it is just for a while!! So bear with me whilst I bring you up to date on Lilly...if you prefer not...then scroll down for today's gift from me to you.

lilly_headshould


The good news is Lilly's scalded foot appears to be slowly getting better, but I was really shocked when I first saw it. I could not believe that water from a tap could inflict such an awful injury, my heart went out to the poor little mite and the pain she must have had to endure. How I wished that it could have been me instead of her, but it turns out that she is much braver than I could ever have been in that situation. It's a warning to us all on how accidents are only a second away and a child moves fast in even a second!!

Having said that she has been so brave and we haven't seen many tears, even when the dressings were being changed. The hardest part for her appears to be seeing the burn. When the dressings are changed her face screws up and she says "Oh no!". When she has her time each day with the dressing off then she sits happily...as long as the area is blocked from her view...so entertainment is required!! It's then that her favourite quilt comes in handy...it works perfectly to block her view. (It was this same quilt that inspired the papers and elements that I have made into a two part download for you all.)

Lilly's also lucky that she has such a down-to-earth mum. Charlotte has been brilliant and even although it cost here dearly, she has smiled as she dealt with Lilly's dressings and taken great pains to distract her as much as possible. That doesn't mean that the panic didn't set in when it first happened!!

Looking back over the last year life has been quite eventful for me...not all good. But I have this stubborn (or stupid?) streak and I refuse to be bowled out. When life throws me or mine hard balls....I get a bat and hit back....even harder!! It may not always be a good thing, but I just hang in there and wait for the chaos to stop. Mind you .....it can take a while, so patience and stamina are need on this one!!!

After all nothing lasts for ever, it doesn't matter if it's good or bad...there is one thing that you can be sure of, everything has a start and an end. My husband says I have the tenacity of a bulldog...I grit my teeth and hold on tight..no matter which way the bronco bucks. That's only because I know eventually it will stop doing it...hopefully before it knocks my teeth out!!!

I use this principle in so many areas of my life..take the dentist....yep you can take mine for one, I am terrified on every visit!!! But before I go in, I tell myself "Hey, it's only 30mins....then it it's over". Saying "It's for my own good" doesn't work for me but a time limit does....I told you I was strange, lol!!

When I had my children I used the same principle. There I was in labour, feeling not so brave...ouch it hurt!! Where was that nurse with the meds? To keep myself calm and hanging in there I firmly told myself "This will only last a few hours...then it stops and think of moment when you can say hello to your own little stranger!!". It worked, but I have to admit that I kept wondering if it would stop soon..I'm really not very brave at all!! Eventually...it did!

Knowing that something has a beginning and an end really helps me hang on when the going gets tough, or if I am just feeling out and out plain scared of a situation!! I might not be sure when the end of it will come, but the comfort is that I know that somewhere down the line what ever it is will stop...hopefully the sooner the better!!

And if all else fails..... grab the bat and keep hitting the balls back with all you've got!! Lol!!

Before I give you the download link for today's gift, I want to say a big thank you to all of you, my friends, who leave comments on my posts, they are very much appreciated.

And finally.......the Lilly's Quilt Papers!! There are 12 in the set, 3 plain papers and 9 patterned with dots, checks and some cute stripes. The elements to match them will be my download on Tuesday..so drop back and collect them too.

jsch_lilquiltpap_folder

If you want to download them you'll find them here.

Have a great day and see you Tuesday!!

Tuesday 18 August 2009

Inspiration

I am inspired!! So many things I have seen recently have been catalysts for the creative flow, not least this wonderful page by Kim over at Kim's Scrappin'.  She chose a wonderful Kit, and used a Miss Lilly photo. The results are breath taking....checkout the little bird on Lilly's shoulder. Thank you so much Kim for this beautiful page!!!!!

Now tell me...who wouldn't be inspired by this?

MagicInTheForest_websize

Credits: In the Forest by Carena's Design,

Word Art also in the kit (Kim just added the word Magic)

This post was going to be longer but I am sorry to say that Lilly has been in the wars and I need to get organised as I am almost certain to be making a trip to Oxford in the morning to see how things are going. I'm clearing the decks tonight of tomorrows scheduled work to free up some time.

Yesterday Lilly scalded her foot and I am glad to say that although it is nasty, it could have been worse. It meant another trip to hospital and a very large dressing on her little blistered foot. Her mum says that at the moment she is swinging between trying to hobble on it and wanting picked up. Her poor mum and dad were devastated that they had not seen it coming...but accidents happen even when we're careful. Kids are just so fast!!

So the rest of this post will have to wait until later this week....sorry!!

Have a great day tomorrow and see you soon.

Technorati Tags: ,

Thursday 13 August 2009

Catch Up Time

Hi all...the prodigal returns!! I bet you thought I was on the missing persons list, it's been a week and no postings. Life has kept me jumping the last 7 days with never a dull moment. So first I'll fill you in a little on my week..and then a gift!!,

The Theme Park trip on Friday went well but I am still struggling to get the photos off my old camera..it's holding on to them and won't let me download them!! I need to have an other wrestling match with it tomorrow and see if it will finally relinquish it's hold.

It was Lilly's first time at a park like this and she loved the kiddie rides..too much so...she didn't want to get off. I was of course overprotective and made a wonderful sight on the children's rides in the backseat...Lilly naturally was driving, lol. My children thought it was hilarious...an 19month old in the front and grandma in the back. I have to admit it was a tight squeeze and it raised a few eyebrows...but I did it!! Mind you I don't think I need have bothered as the little lady in question was squealing with glee. It was definitely her kind of thing.

Lilly and her parents stayed until Monday evening, so the weekend was full to overflowing with events, but it was all great fun. On Saturday we went to the street market in Lymington and browsed. There were eight of us and we kept loosing each other, but eventually we reunited in time to eat. I love markets they have such a wide variety of goodies on sale and the atmosphere is brilliant.

DSC00891

DSC00899

DSC00907

DSC00908

I told you that I was putting together some bookcases with doors...well here they are. This was taken last Thursday before the company arrived. Tuesday I finished filling them with books and they look so much better, but I thought I'd let you have a peek. I still need to get the mirrors and pictures up in the rest of the room and find the accent touches, like changing the lamp shades, cushions, new curtains...need I go on? But it gives you an idea of what I've been up to. I'll post some more photos as it progresses.


DSC01051


DSC01053

The sun shone on Sunday and the lovely Lilly threw her clothes away and so we spent the day covering her in sun cream. Good job it was water proof for every time we put it on...she headed for the paddling pool!! Typical! But we all enjoy the day and the sun was beautiful, warmth...how I love it.

However, when Tuesday dawned, it was work as usual for me, time to pay the price and catchup on the backlog. But I can honestly say it was worth it. It's taken me three days of hard slog but I'm back to the point that by the weekend ....I'll be ready for the next round of chaos!!! Lol!

Now, my gift for you. I hope there is something for everyone, designers, scrappers, Photoshop lovers, whatever ....or that's my hope. It's just some simple folded or curled papers, but they can be used in so many different ways. Each piece is quite large, that way it expands the range of things you can use them for. They're large enough to use as mats in you work, or scaled down they can be used for embellishments...your choice.

If you design there's a grayscale pack to download...if not then there is a separate pack of coloured examples to add to your pages. Or grab them both!!! I hope you have fun playing with them and adding your own personal touches to make them your own.

jsch_foldedcurled_folder

You can download the grayscale pack here

jsch_sample-papers_folder

You can download the sample papers here

Well, time for me to go. Take care and have a great evening/day!!


Thursday 6 August 2009

Nearly Done!!!

I'm nearly done my living room!! The paint and paper are finished and the cracks are sealed. I can't believe that the chaos is almost at an end. Living in a clutter is not my idea of fun at the best of ties...but this was awful, it just took so long with constant interruptions which were unfortunately unavoidable.

I have to admit I was a little disappointed when I had finished painting and stood back and took a long look. I had decided that I wanted to go for neutral in the decor so I could dress it up with accent colours that contracted with the dark blue of our sofas. But with I looked at it with very little furniture in and all that wall... it looked.....well.....nondescript!! Bland, washed out and plain. But it's moving on....the new carpet went in...yes, neutral again, but at least a bit darker....and it started to show some promise. Not a lot, but a little.

It went a stage further today, it was bookcase building day. I have so many books and so little space, so bookcases with doors were called for. I needed the doors because I hate how dusty books can get just sitting about on shelves. I have to admit with them in place it's starting to come together...but it still needs some colour!!!! But I do feel a little stirring of pride with how it's staring to look, perhaps all the hard work will be worth it in the long run. A few more days and it will be ready to show you all!!

For now though...it's going on hold...again!!! Lilly, Charlotte and Ali are arriving any minute and tomorrow we are all taking Lilly to Paulton's Park for the day. Chris, Cheryl and Kevin are coming too so it will be busy!! A real family day out, so please...no more rain!!!! It's been arranged for ages and not something I wanted to put off...so it's down tools again.

The latest news on my mum, is great. She's recovering well now from the flu and subsequent chest infection, but she is still not up to a day trip out. That's just too ambitious!! We'll all visit her on Saturday, or should I say invade her, lol.

I hope that next week I will get back to normal (what me normal!!) and settle down into my usual routine. The last few weeks have been too chaotic and disorganised for my liking, but they have had variety, lol.

Now my gift for you before I rush off.

If you like overlays then this one is one of my favourites. It's a torn paper one that is ideal for vintage or grunge papers. There are actually two overlays in the download, slightly different tones in each. They're quite large files but well worth a look. Have fun with them and layer, change blending modes, colour...anything that takes you fancy!! Just play and see what you come up with. I always find that the more I play the better the results....perhaps that's why I take so long making things...I play too much!!! Lol!

If you don't use overlays then there's some example papers that you can snag and use. The overlays are for personal or commercial use, the papers are personal use only.

Here's one of the overlays.

jsch_tornoverlay_folder

You can download the Overlays here

And here's the example papers.

jsch_tornpapers_folder

You can download the Papers here

Have a wonderful day tomorrow and think of me at the theme park!! Hopefully if the rain stays off I'll have lots of pictures too. Till next time...be good!!

Friday 31 July 2009

Split Bent Frame Tutorial

image


As promised I have knocked together a tutorial for the Split Bent Frame....it's quite long......so I have added a link for you to download it as a PDF file to use if you prefer.   I just hope you can understand it!! Lol! You'll find the link at the bottom of the post.

First....an update on the my mum. Unfortunately she developed a chest infection in the middle of the week and needed antibiotics and some steroids..but the good news is..she is starting to feel better today!!! Hurray!!!

The latest on the decorating is that I've finished the ceiling, gloss and put up a lining paper on our awful walls, so that I can paint them. Now, I just need to paint the paper and then I can get some new carpet down!!!!! All this in one week and with DH laid up with a bad back. I am really pleased that what looked like a disaster week has turned out so much more productive than I thought. It just goes to show, you never know what you can achieve...mind you it does help if you don't sleep, lol!!

Now for the tutorial!!

I use Photoshop CS2  but I am sure you can adapt it for your own software. It is quite a long tutorial and I hope that I explain it clearly, forgive me if I don’t!!

You can use it for personal or commercial use..just don't claim it as your own!!

So let’s get started!

1. Open the photograph that you want to use. Check the image size and do any cropping you want to make before we start. (I had mine at 300dpi, 9 inches x 5 inches. You can always scale it down after it’s framed, but it‘s easier to work on at this size).

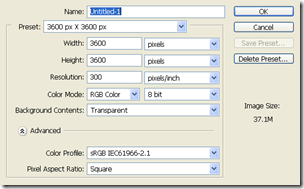
2. Now open a new file 3600 x 3600, 300dpi, RGB color, Transparent and move your photograph into the new file.

image

image

3. To split the photo we need to make a template. We’re going to split the photo into 3 pieces, you could make this 2 or 4...it’s up to you, but for now we will do three bits.

Select the Rectangle Tool and make sure your colours are the default black and white. (If they’re not then press D to reset them.)

image

Before you draw out the rectangle, check in the top tool bar that you have selected the first icon in the group of three, the shape layer icon.

image

4. Check the width of your photograph, we need to draw out a rectangle over one third of the photograph. As my photo is 9 inches wide mine needs to be 3 inches wide and the height of the photo.

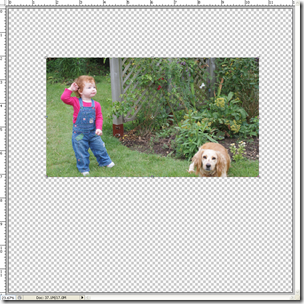
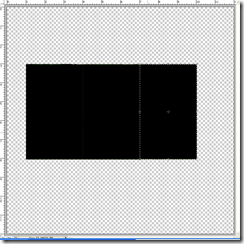
So starting at the left end of the photo drag out a black rectangle over a third of it. This is what it mine looks like.

image

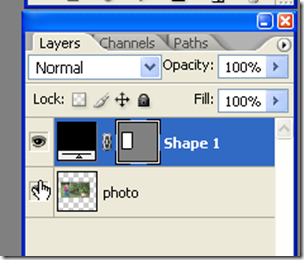
And this is what your layers palette should like, showing your photo layer and a shape layer.

image

5. We have the first part of the template now we need to duplicate this layer twice to give us the three pieces of our template.

There are several ways you can do this, my favourite way is to make sure that the shape layer is the active layer and then right click on the layer and pick Duplicate layer from the fly out menu. 

image

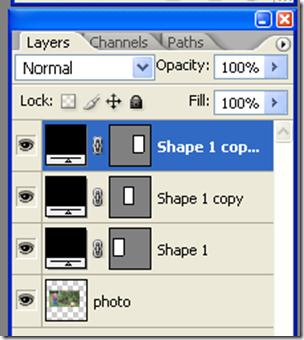
At this point I always rename the layers for easy recognition.
So I would start at the bottom of the black shape layers that will form our template and rename  them as left, middle and right . That way I can find them quickly.

6. Now we need to position the rectangles over the photo. At the moment they are in a stack and we need them to cover the whole photo before we can use them to cut it up.

Select the right rectangle (Shape 1 copy)  and holding down the shift key move it over to the right into the middle of the photo. (Holding down the shift key whilst you drag will make sure that the layer stays inline with the other layers as you drag it).

Now select the middle rectangle (Shape 1 copy 2) and drag it to the right end of the photo. You should now have covered the whole photo with these three layer and it will no longer be visible.

image

7. With the left rectangle layer active right click, and pick Rasterize from the drop down menu.
(You’ll notice that this changes how the layer looks in the layer palette and you now only have one black rectangle showing.)

Repeat this for the other two rectangle layers.

8. Click on the left rectangle layer to make it active, and then hold down the CRTL key and click the layer icon this will give you marching ants around the shape.

With the marching ants still active click on the original photo layer to make that layer active.
Now press CTRL +J.
This will promote the left part of the photo only onto a new layer of it’s own without altering the original photo.
Repeat this for the other two rectangles (middle and right) so that you have three new layers each with a part of your photo.

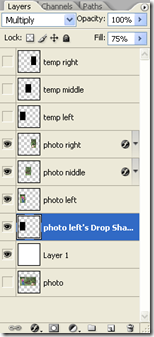
You should now have 7 layers: 3 rectangle template layers, 3 photo layers and the original photo layer. 

Click the eye on the original photo layer to make it invisible.

This is how your layers palette should look. (Note I have renamed my layers for easy recognition)

image

You don’t need the black rectangles for the moment, so click the eye icon on each of their layers to make them invisible.

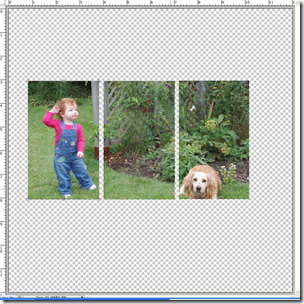
9. You now have your photo cut into three bits. Move the three pieces slightly apart as I have done so that you have a small gap between each piece. We need a little space for the white border we will add later.

image

10. Now we need to add a drop shadow to each of the photo pieces.

Double click on the left photo layer to open up the layers style palette.

image

Select Drop Shadow at the top of the list on the left hand side.

Above are the settings I used:
Multiply, black, opacity 75%, distance 27, spread 0, size 38.

Then click OK.

Use these settings and apply the drop shadow to the other two photo piece layers.

11. Now for the fun part!! To be able to distort and warp the photo corners and keep the shadows realistic we need to separate the shadow from the photo piece.

To do this click the left photo piece layer to make it active.

Now right click on the little down arrow head, on the far right of the layer.

image

This will give you a drop down menu, choose Create Layer.

image

You will get a message saying that some effects cannot be reproduced…just click OK.

This splits any layers styles that you have used for a layer and puts each one on it’s own individual layer.

The drop shadow will now be on it’s own layer so we can play and distort the photo piece and the shadow will stay unchanged.

image

You now have an extra layer with the drop shadow for the photo piece. You need to do this for the other two photo piece layers to separate their drop shadows too.
So repeat section 11 for each of the photo layers.

12. The next thing we need to do is warp the photo corners to make them look curled.

Click on the left photo layer and from the top tool bar select Edit>Transform>Warp.

This will give you a grid around the left photo piece. Drag the bottom left corner up and to the left slightly to make the corner appear curled.

image

Next move to the top left corner and drag it up and to the right slightly to curl it too. Have a play with this, you can bend them anyway you want, you don’t have to do exactly as I do..it’s your choice.

When you have finished click the tick in the top tool bar to accept.

Repeat this with the other two photo pieces to curl and warp one or more of their corners.

image

13. Finally we need to add a white border to the photo pieces to finish them. It’s easier to merge the photo pieces and do this in one for all the photo pieces.

Hold down the CTRL key and click on each of the three photo layers to make them all active. Then press CTRL + E to merge them to form one layer.

Click on the icon in the merged layer and you will get the marching ants around the photo pieces.

14. Make a new layer just above the merged photo pieces layer and click on the new layer to make this the active layer.

Now in the top tool bar select Edit> Stroke and use the settings below, then click OK..

image

This will give you a new layer above the photo pieces with a white border. This is your photo edge.

You can now merge the three drop shadow layers, photo layers and white border and transfer to your layout.

Or you can save the template, shadows and white border as a psd file to use again!!!

TIP

The beauty of keeping the drop shadows separate is you can still change them to blend with any back ground you add by changing the Opacity of their layers.

So if you find the shadow too harsh for a light background then just lower the opacity or change the blend mode of this layer.

But don’t take my word for it…have a play!!

If you want to download the tutorial in PDF you'll find it here