
As promised I have knocked together a tutorial for the Split Bent Frame....it's quite long......so I have added a link for you to download it as a PDF file to use if you prefer. I just hope you can understand it!! Lol! You'll find the link at the bottom of the post.
First....an update on the my mum. Unfortunately she developed a chest infection in the middle of the week and needed antibiotics and some steroids..but the good news is..she is starting to feel better today!!! Hurray!!!
The latest on the decorating is that I've finished the ceiling, gloss and put up a lining paper on our awful walls, so that I can paint them. Now, I just need to paint the paper and then I can get some new carpet down!!!!! All this in one week and with DH laid up with a bad back. I am really pleased that what looked like a disaster week has turned out so much more productive than I thought. It just goes to show, you never know what you can achieve...mind you it does help if you don't sleep, lol!!
Now for the tutorial!!
I use Photoshop CS2 but I am sure you can adapt it for your own software. It is quite a long tutorial and I hope that I explain it clearly, forgive me if I don’t!!
You can use it for personal or commercial use..just don't claim it as your own!!
So let’s get started!
1. Open the photograph that you want to use. Check the image size and do any cropping you want to make before we start. (I had mine at 300dpi, 9 inches x 5 inches. You can always scale it down after it’s framed, but it‘s easier to work on at this size).
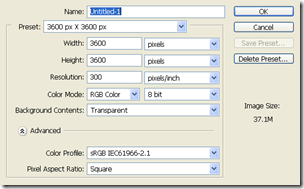
2. Now open a new file 3600 x 3600, 300dpi, RGB color, Transparent and move your photograph into the new file.
3. To split the photo we need to make a template. We’re going to split the photo into 3 pieces, you could make this 2 or 4...it’s up to you, but for now we will do three bits.
Select the Rectangle Tool and make sure your colours are the default black and white. (If they’re not then press D to reset them.)
Before you draw out the rectangle, check in the top tool bar that you have selected the first icon in the group of three, the shape layer icon.
4. Check the width of your photograph, we need to draw out a rectangle over one third of the photograph. As my photo is 9 inches wide mine needs to be 3 inches wide and the height of the photo.
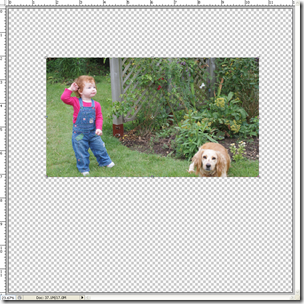
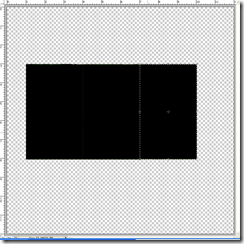
So starting at the left end of the photo drag out a black rectangle over a third of it. This is what it mine looks like.
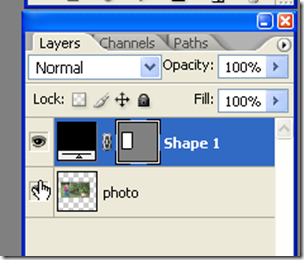
And this is what your layers palette should like, showing your photo layer and a shape layer.
5. We have the first part of the template now we need to duplicate this layer twice to give us the three pieces of our template.
There are several ways you can do this, my favourite way is to make sure that the shape layer is the active layer and then right click on the layer and pick Duplicate layer from the fly out menu.
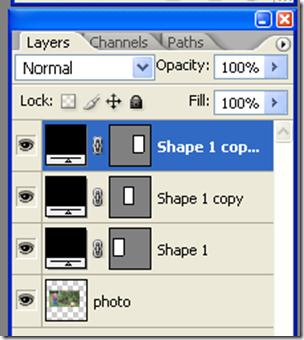
At this point I always rename the layers for easy recognition.
So I would start at the bottom of the black shape layers that will form our template and rename them as left, middle and right . That way I can find them quickly.
6. Now we need to position the rectangles over the photo. At the moment they are in a stack and we need them to cover the whole photo before we can use them to cut it up.
Select the right rectangle (Shape 1 copy) and holding down the shift key move it over to the right into the middle of the photo. (Holding down the shift key whilst you drag will make sure that the layer stays inline with the other layers as you drag it).
Now select the middle rectangle (Shape 1 copy 2) and drag it to the right end of the photo. You should now have covered the whole photo with these three layer and it will no longer be visible.
7. With the left rectangle layer active right click, and pick Rasterize from the drop down menu.
(You’ll notice that this changes how the layer looks in the layer palette and you now only have one black rectangle showing.)
Repeat this for the other two rectangle layers.
8. Click on the left rectangle layer to make it active, and then hold down the CRTL key and click the layer icon this will give you marching ants around the shape.
With the marching ants still active click on the original photo layer to make that layer active.
Now press CTRL +J.
This will promote the left part of the photo only onto a new layer of it’s own without altering the original photo.
Repeat this for the other two rectangles (middle and right) so that you have three new layers each with a part of your photo.
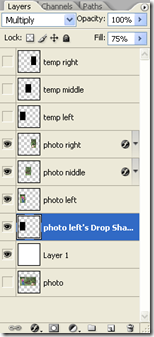
You should now have 7 layers: 3 rectangle template layers, 3 photo layers and the original photo layer.
Click the eye on the original photo layer to make it invisible.
This is how your layers palette should look. (Note I have renamed my layers for easy recognition)
You don’t need the black rectangles for the moment, so click the eye icon on each of their layers to make them invisible.
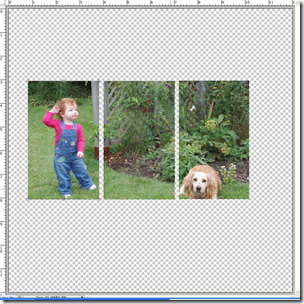
9. You now have your photo cut into three bits. Move the three pieces slightly apart as I have done so that you have a small gap between each piece. We need a little space for the white border we will add later.
10. Now we need to add a drop shadow to each of the photo pieces.
Double click on the left photo layer to open up the layers style palette.
Select Drop Shadow at the top of the list on the left hand side.
Above are the settings I used:
Multiply, black, opacity 75%, distance 27, spread 0, size 38.
Then click OK.
Use these settings and apply the drop shadow to the other two photo piece layers.
11. Now for the fun part!! To be able to distort and warp the photo corners and keep the shadows realistic we need to separate the shadow from the photo piece.
To do this click the left photo piece layer to make it active.
Now right click on the little down arrow head, on the far right of the layer.
This will give you a drop down menu, choose Create Layer.
You will get a message saying that some effects cannot be reproduced…just click OK.
This splits any layers styles that you have used for a layer and puts each one on it’s own individual layer.
The drop shadow will now be on it’s own layer so we can play and distort the photo piece and the shadow will stay unchanged.
You now have an extra layer with the drop shadow for the photo piece. You need to do this for the other two photo piece layers to separate their drop shadows too.
So repeat section 11 for each of the photo layers.
12. The next thing we need to do is warp the photo corners to make them look curled.
Click on the left photo layer and from the top tool bar select Edit>Transform>Warp.
This will give you a grid around the left photo piece. Drag the bottom left corner up and to the left slightly to make the corner appear curled.
Next move to the top left corner and drag it up and to the right slightly to curl it too. Have a play with this, you can bend them anyway you want, you don’t have to do exactly as I do..it’s your choice.
When you have finished click the tick in the top tool bar to accept.
Repeat this with the other two photo pieces to curl and warp one or more of their corners.
13. Finally we need to add a white border to the photo pieces to finish them. It’s easier to merge the photo pieces and do this in one for all the photo pieces.
Hold down the CTRL key and click on each of the three photo layers to make them all active. Then press CTRL + E to merge them to form one layer.
Click on the icon in the merged layer and you will get the marching ants around the photo pieces.
14. Make a new layer just above the merged photo pieces layer and click on the new layer to make this the active layer.
Now in the top tool bar select Edit> Stroke and use the settings below, then click OK..
This will give you a new layer above the photo pieces with a white border. This is your photo edge.
You can now merge the three drop shadow layers, photo layers and white border and transfer to your layout.
Or you can save the template, shadows and white border as a psd file to use again!!!
TIP
The beauty of keeping the drop shadows separate is you can still change them to blend with any back ground you add by changing the Opacity of their layers.
So if you find the shadow too harsh for a light background then just lower the opacity or change the blend mode of this layer.
But don’t take my word for it…have a play!!
If you want to download the tutorial in PDF you'll find it here








29 comments:
Nice tut, June. Quite clear and explained something that i can do easily in PSP that i couldn't figure out in PSCSx. Thank you!
omg june! that is an excellent tutorial! thank you so much. i am going to go play with that and when i am done i will post it and credit you. fantastic!
i am happy to hear that your mom is doing better, and that you are almost done with your decorating. holy buckets with all that is going on i can't believe you still had the energy to do that tutorial.
So glad that your mom is getting better! You sure have a lot of energy & stamina missy! Thanks for the tutorial :)
thank you so much for this tutorial I love it
hugs
Deborah (damc)
Glad your mother is on the mend. You sure have your hands full with the painting etc, and all on your own. Thanks so much for the wonderful tutorial, such a great look! Cute photo you used for the tutorial too! :)
Glad to hear your Mum is getting better - and thank you for the great tutorial!
glad to hear that your mom is getting better. Maybe you could lend me some of your energy and ambition so I could get some work done around here...lol
Great tut, can't wait to try it out
Thanks for this nice tutorial.
Have tried it immediately
Beautiful result!
Greetings from Holland..
Katootje
Thanks want a lovely clear tut. I think i will be able to translate that to GIMP fairly easily. One things GIMP does as standard is it has the drop shadows as a separate layer so I will not have to separate it out as you did.
Hope your mum gets well fast now she is feeling brighter and glad the decorating is going well!
Thank you so much for sharing your knowledge.
dangit, my photoshop is too old and i don't have the tools to be able to do this. i was so looking forward to it. oh well.
i have something for you on my blog june. have a great weekend!
June, thanks for putting together this tutorial and saving in PDF format. I really enjoy collecting these tut's and usually they are not in PDF format and I can't print them out blog style (takes up too much paper and ink), LOL. Glad your dear mum is doing better. Hugs -- xoxo! (terri - hawaii)
Thank you for taking the time to write this tutorial June. I don't have Photoshop but can usually adapt tuts to my programme. Will give it a go anyway. Hugs.
Hi June!
Oh my! That looks very complicated. Thanks for sharing.
Thanks also for dropping by and leaving your comment. Have a great Sunday!
I'm glad your mom is beginning to feel better. I'm also happy to hear the decorating is coming along. Good luck!
Thank you for such a clear, detailed tutorial ..... this is all so foreign to me but hopefully I can follow your directions. Always such fun visiting your blog!
Nicely done! I have always admired people who design their own graphics, plus have the ability and patience to write a tutorial!
Great job! Happy week June!!:-)
You are AWESOME for sharing this tut! :) Thank you so much! :) Have a MARVELOUS Monday!
Thanks for this awesome tut!!!
Thank you for the work you put into doing this wonderful tutorial.
June you are amazing! Thank for the tutorial, I am going to have to try it now.
I can't wait to try this... gonna do it while my daughter is in gymnastics tonight!
what a fabulous tutorial!! Thank you!
Thank you, I needed this :)
Thank you so much for this tutorial! I've just been starting to tinder around with this technique, and you've done the hard part for me!
Blessings~
Amber
Hi, there,
Thank you for the great tut! I'm so behind! LOL Lightning struck and burnt a hole in my mother board. I was off line for a week. It was awful! LOL I hope things can stick to an even keel for a little while! We can all use it.
Hugs to you,
Su
Formidable et merci beaucoup. Malgré la différence de langue j'ai réussit à suivre le tutorial.
encore un enorme MERCI
Marie-claire
Formidable et merci beaucoup. Malgré la différence de langue(je suis en France) j'ai réussit a suivre le tutorial. c'est très clair. MERCI encore
Post a Comment